5 Ultimate Steps to Create a 3D Rendering for an Interior Design
- Dec 9, 2021
- 8 min read
Updated: Feb 6, 2023
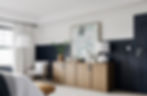
"How do I create a 3D rendering for an Interior Design?" This is a common question that interior designers ask themselves when they are looking to promote their work. 3D renderings are used in many ways different ways that can benefit your firm. One of the most popular ways it's used, is to sell or market an interior design.

3D renderings also allow you to show your client what the finished product will look like before any work begins. This can help ease concerns and build rapport as their designer. It also allows you to get feedback on the design like color choices, before anything has been finalized. Particularly, this means less time wasted and more money saved!
Step 1: Your Interior Idea Being Designed as a Rendering
One of the first steps to creating a 3D rendering is coming up with your interior idea. What type of space are you designing? A living room, kitchen, or maybe a bedroom? Is it going to be in an existing structure like a home or office building? Maybe it is a brand new building and you are starting from scratch? This can help determine what types of 3D renderings you need later on down the road.

Once you have completed your design sketch (which should include notes about where all the furniture goes), ensure that each piece is labeled appropriately. Next, create floor plans that show how large everything is in relation to one another. This will help demonstrate the size of the furniture and where it will be in 3D space.
You can also use interior elevations to help show the vertical dimensions of items better than a floor plan does on its own. For example, these drawings will give the artist more information about visualizing depth, making them perfect for showing off cabinet details!
Do You Already Have a Floorplan or Elevations?
Lastly, what is needed is where the view of the rendering should be located. This helps you or the artist to know how to capture the interior design idea.
A top-down view or bird's eye view gives a good perspective on space. Although, sometimes it can leave awkward spacing to show the finer details you want to show off to your clients. Otherwise, a first-person view (as if you were standing in the space in real life) would be a good fit to help the client visualize themselves in the space.
It depends on how you want to showcase the 3D rendering when it is finished and its intention.

Step 2: 3D Modeling an Interior Design
3D modeling an interior space starts with 2D floor plans. Extruding walls and creating voids in those walls to show windows, mullions, muntins, and glass material.
The same steps can be taken for other parts of the design, such as a fireplace, the furniture, the ceiling design, and/or the light fixtures. 3D floor plan models are used to create 3-dimensional spaces to create a building or structure. They can be created in architectural visualization programs such as SketchUp, 3ds Max, and AutoCAD.

There is one big issue interior designers run into when it comes to 3D modeling software. It can be extremely pricey, especially 3Ds Max and AutoCAD, used for 3D rendering interior design ideas. 3Ds Max is a commercial product that costs between $3000 to $5000 depending on the version you need.
An Alternative to Expensive 3D Rendering Programs
SketchUp is an easy-to-use 3D program with some excellent rendering capabilities at no cost! So it's ideal for students and new 3D designers who want to learn 3D design basics without spending any big bucks. Even though SketchUp does not have all the 3D modeling tools of other 3D programs, it's still effortless to make 3D models.
Some interior designers also like SketchUp because they can play around with different couches and tables in their designs before making an investment on what would look best in the space. This saves them time shopping for items at several furniture stores since they will already know how everything will fit together when arranged inside a 3-dimensional model.

It also helps save money because you don't have to buy new pieces to find out later that your design isn't working right or doesn't provide enough seating room. Many interior designers use SketchUp simply because of its low cost, and makes it accessible without breaking the bank!
Step 3: Rendering Your 3D Model into an Interior Rendering
3D rendering an interior design is the process of taking 3D models and having them rendered in a render engine. Whether you use 3Ds Max, Maya, Rhino 3D, or another 3d modeling software to create the model - it will need to be brought into a render engine such as V-Ray for 3DsMax or Mental Ray within Maya. Once inside these programs, surfaces can be textured with realistic images of materials such as fabrics and wallpapers, making your 3D model look like an actual room in real life!
V-Ray for example has two types of textures: procedural and image-based. Procedural means that V-Ray generates them automatically while working on lighting scenes, whereas Image-Based (also known as "Photo Textures") requires some extra work but often creates the best final renderings. 3D rendering interior design professionals typically use 3Ds Max for 3d modeling and V-Ray for the render engine for the best photo-realistic results.
Introducing Textures into Your Rendering
Texture maps can be created with Google images, Photoshop, or 3DsMax cloth simulation tools to map out the shapes of materials onto your 3d model surfaces, which gives them an accurate feel in real life. For example, adding a bumpy fabric texture on 3D modeled sofa cushions creates the illusion that you are genuinely seeing fabric on the 3D furniture.
Maya's Mental Ray Render Engine uses an innovative rendering technology known as "Multiple Importance Sample," which gives your 3ds Max renders a higher quality look by only having the most critical areas rendered in more detail.

As you can see, there are many ways to bring a black and white 3D model to life using many different rendering engines on the market. The major caveat is understanding how to use each software and mastering its features. There is a bit of a learning curve. Rome wasn't created in a day, nor was your creativity to see an interior space layout before it is laid out. The same goes for learning and creating your own photo-realistic rendering.
Step 4: Adding entourage to a 3D rendering for an interior design
Entourage in 3D rendering consists of blankets, remotes to TVs, slippers or shoes, a coffee mug, plants, picture frames, and decorations. Entourage brings life into the 3D interior space and gives it personality. Staging entourage items also helps provide a more human feel as if someone was living in that space. For example, by adding clothes hanging on hooks or placing dishes out of cabinets ready to be used.
Adding these elements will bring all your 3d designs together with one common goal; to make them believable regardless of what style you are going for. Whether you are going for a contemporary or traditional interior style, both types can use this technique successfully because it draws the viewers' eyes around the room, giving an illusion of reality.
It's always best practice to use entourage and interior design elements that is 3D modeled than adding them in Photoshop to create a 3D rendering. By using an entourage that is 3D modeled, you get the best control over your scene by making them fully adjustable, changeable in size and color with just a couple of clicks.
It's also important that when adding 3D entourage into the interior space you need to match it up correctly, so it looks natural and not out of place. This can happen if an object doesn't blend well with its surroundings: colors should be consistent - avoid clashing colors together such as red next to blue; different patterns on items should complement each other too like stripes with polka dots; the scale of objects must reflect their real-life scale.
3D entourage doesn't have to be 3D modeled objects though. Real-life items or handmade items can work just as well by taking a photo of them. 3D interior design elements are very versatile in what you can do with them, so don't limit yourself when designing your own 3D renderings.
Step 5: Finalizing a 3D Rendering for an Interior Design Using Post-processing.
Post-processing a 3D rendering is all about adjusting lighting levels, white balance, and any color problems. Software that is used for post-processing is photoshop and lightroom. Depending on the interior design project you're working on, it might be necessary to use other software.
Two of these softwares are 3D Studio Max or Maya; however, this step should always come after completing the 3D rendering. Adjusting 3D renderings and color-correcting them is necessary so they will end up looking realistic. This is the final step of a 3D rendering interior design project before you're ready to export and use them for marketing materials.
How to Begin Post-processing in your Interior Design
Begin by opening your 3D rendering in photoshop or lightroom. This process will work best if exported as a high-resolution jpg format from 3D Studio Max or Maya.
Make sure all layers are visible. Then go through each layer one at a time using levels adjustment tools to adjust lighting levels, contrast/brightness, etc. Once satisfied with the image appearance, save it as another file without altering the original source files. We will go over a
Remember, these 3D renders can take hours to create! To avoid losing any data, make sure you save frequently when working on an interior design project involving a 3D rendering.
The best software to use is Adobe Photoshop because of all the features available (layers, masks, etc...). However, it can also be expensive. Other post-processing software like Gimp or Pixlr are free alternatives that can be quite useful.
It all depends on your operating system and what you're trying to achieve in your 3D rendering post-processing. These alternative programs do not have many advanced options like Photoshop. Nonetheless, they still get the job done when working with 3D interior design rendering. It is just making sure colors look realistic for the purposes of the rendering.
3D Rendering your Interior Design Yourself. Is it Worth It?
3D rendering is a complicated process that can take 3-12 months to get good at and also requires expensive software, computer hardware, and 3D artist skills. For this reason, it's not recommended for interior design newbies to 3D renderings or even interior design professionals looking to save their valuable time and money to create these renderings yourself.
Having a dedicated staff member on your team trained would be the most cost-effective and time-efficient alternative. If hiring another team member isn't an option, then outsourcing would be your best choice of action.

Many options are available when outsourcing 3D renderings for an interior design. 3D renderings are the most outsourced service amongst architects, engineers, interior designers, and real estate agents. There are lots of 3D artists who offer high-quality 3D renderings within their portfolios. Be sure to ask for their portfolios to ensure their rendering style matches your firm's design style.
The Reality and Cost of Creating Your Own Renderings
Some professionals specialize in 3D renderings for interior design. Their packages usually range from $350 to thousands of dollars depending on what is being rendered, the size of the project, and how much time is needed to complete the job. On average, each rendering job can take a few days to a few weeks.
To avoid wasting money (note that it can take up to $20,000 after acquiring the proper computer hardware, software, and training tutorials needed) and time, we recommend outsourcing your 3D rendering interior design project to a professional 3D artist. This will save you thousands of dollars and a world of headaches. Also, it allows you to focus on what you enjoy the most; designing interior spaces for your clients!
Fortunately, Masitects offers a free quote analysis on your project. Whether you are looking for interior renderings or exterior renderings for your project, Masitects can offer a tailored quote for your particular project. Commercial or residential project, to a still photo-realistic rendering or an animation, Masitects' team of expert artists can help bring your interior design to life.
All Masitects would need is a furniture floor plan layout and elevation or two of your interior design projects, and we can give you an estimate within 24 hours before ever having to make a commitment!
Give us a call today, or use our Request a Quote form for an easy and fast experience.


